Use Azure Table Storage with Azure Serverless Functions and Node.js
Main Content
Author: James Edwards Published: 2/1/2021 Updated: 2/3/2022
Author: James Edwards Published: 2/1/2021 Updated: 2/3/2022
Before developing with Azure Serverless Functions and Azure Table storage locally, there are some tools required to emulate Azure Storage and provide a run-time environment for the Node.js serverless functions. Please make sure the prerequisites are set up before running the example code that follows.
In order to save on development costs, instead of creating cloud resources, we can install the Azure Storage Emulator for development and testing. If you aren't using windows, Azurite is an open source Azure storage API compatible server, and it is recommended by Microsoft to use. Otherwise, after installing, Windows users can search in the start menu for "azure storage emulator" and press enter to start the emulator. This should open a cmd window that will indicate the emulator is running, and some helpful commands. The cmd window can be closed and the emulator will continue to run.
Next we'll need to download Azure Storage Explorer to interact with the emulated storage environment. This application is available for Windows, Mac, and Linux machines. After installing go ahead and start the Azure Storage Explorer, and in the left hand column navigator find the dropdown section labelled "Local & Attached" and then within that section find the secondary dropdown "Storage Accounts" and within the tertiary dropdown "(Emulator - Default Ports)" is where the resources, that we have not yet created, will be displayed. Here you can see three additional dropdown sections:
Our focus will be on the "Tables" section, which should be empty since no tables have been programmatically created yet.

Now that we have the storage emulator and storage explorer configured we can download the Azure Functions extension for Visual Studio Code. If you don't have Visual Studio Code you can download it, and then follow the instructions to configure the local project. You don't need to follow the naming convention indicated in the documentation, but what is important is that there is a package.json created in the functions project. The package.json file is created automatically and allows us to include the npm package provided by Microsoft to interact with Azure Storage.
In the same folder as the package.json that was created, run the command npm install azure-storage --save and then run the command npm install @types/node --save-dev to install the type definitions for Node.js. This will install the azure-storage npm package to the local functions project so that we can import it in our code.
Congratulations, you made it through the setup configuration!
Now we can write the code to use Azure Table Storage with Azure Serverless Typescript Functions. To begin find the file "index.ts" in the HTTP trigger function that was created earlier (if using the default it will be called HttpTrigger1). Right now there is sample code in that function that can be deleted, and the code below can be added.
The function should now look like this:
import { AzureFunction, Context, HttpRequest } from "@azure/functions";
import * as azureStorage from "azure-storage";

const httpTrigger: AzureFunction = async function (
  context: Context,
  req: HttpRequest
): Promise<void> {
  context.log("HTTP trigger function processed a request.");

  // set content type for all responses
  context.res!.headers["Content-Type"] = "application/json";

  if (req.method == "POST") {
  } else if (req.method == "GET") {
  } else if (req.method == "PUT") {
  } else if (req.method == "DELETE") {
  } else {
    // request method does not match
    context.res!.status = 500;
  }
};

export default httpTrigger;
Before we can retrieve data from Azure Storage we need to insert data by using an HTTP POST request, additionally a table must be created to store the data. To ensure there is a table to store data we can programmatically create the entity table if it does not exist with the azure storage npm package, at the time of the POST request. In order to connect to the storage emulator a connection string is required, which can be stored as an environment variable to be passed into the Node.js serverless functions process. To do this add the default local connection string to the file "local.settings.json" that is in the same folder as the HttpTrigger1 function. Additionally we want to add a "Host" configuration to permit CORS requests and set the default port that the functions will run on.
The local.settings.json file should now look like this:
{
  "IsEncrypted": false,
  "Values": {
    "AzureWebJobsStorage": "",
    "FUNCTIONS_WORKER_RUNTIME": "node",
    "TableStorageConnection": "UseDevelopmentStorage=true"
  },
  "Host": {
    "LocalHttpPort": 7071,
    "CORS": "*",
    "CORSCredentials": false
  }
}
Now we can use the "TableStorageConnection" environment variable to create a table.
import { AzureFunction, Context, HttpRequest } from "@azure/functions";
import * as azureStorage from "azure-storage";

const httpTrigger: AzureFunction = async function (
  context: Context,
  req: HttpRequest
): Promise<void> {
  context.log("HTTP trigger function processed a request.");

  const tableService = azureStorage.createTableService(
    process.env["TableStorageConnection"]
  );

  const createTableIfNotExists = (tableName: string) =>
    new Promise((resolve, reject) => {
      tableService.createTableIfNotExists(tableName, (error, result) => {
        if (error) {
          reject(error);
        } else {
          resolve(result);
        }
      });
    });

  // set content type for all responses
  context.res!.headers["Content-Type"] = "application/json";

  if (req.method == "POST") {
    try {
      await createTableIfNotExists("TestTable");
    } catch (error) {
      console.log(error);
      context.res!.status = 400;
      context.res!.body = {
        message: "An error occurred.",
      };
    }
  } else if (req.method == "GET") {
  } else if (req.method == "PUT") {
  } else if (req.method == "DELETE") {
  } else {
    // request method does not match
    context.res!.status = 500;
  }
};

export default httpTrigger;
Once that table service is initialized the "tableService.createTableIfNotExists" function can be used. This function by default, uses a callback function to obtain the result. Instead of using the callback, the function is wrapped in a Promise which can asynchronously resolve the callback function or return an error. Following that the promise is awaited inside a conditional branch that will only execute if the incoming request is a POST request.
The function can now create a new table if it doesn't exist named "TestTable" on any incoming POST request. To test this out run the function (in Visual Studio Code press F5), and then download Postman to mock requests. Copy the url provided in the terminal window where the function is running, if you kept the default configuration this url will be "http://localhost:7071/api/HttpTrigger1", and change the request method in Postman from GET to POST and send the request. In the response body displayed in Postman all that will show is the number "1", however if we use the Azure Storage Explorer to view the emulator tables we can see that the "TestTable" was successfully created. You may need to select "refresh all" in the storage explorer to see the new table.
Now that the table will be programmatically created if it doesn't exist, we can add a request body to the POST request that is being sent in Postman. This data will be parsed with the querystring module included with Node.js and then a storage entity can be generated from the incoming data. Once the storage entity is generated it can then be saved to the storage table.
To facilitate the saving of the table data we can use the uuid npm package, to install run the command npm install uuid --save and then install the typescript type definitions with the command npm install @types/uuid --save-dev.
Add the following import statements to the index.ts file:
import * as querystring from "querystring";
import { v4 as uuidv4 } from "uuid";
Then add the following inside the POST method conditional branch:
//parses www-form-urlencoded request body
const body = querystring.parse(req.body) as {
  firstName: string;
  lastName: string;
  age: string;
};

if (!(body && body.firstName && body.lastName && !isNaN(Number(body.age)))) {
  context.res!.status = 400;
  context.res!.body = {
    message: "The data is invalid.",
  };
  return;
}

// inform table storage of row types
const entityGenerator = azureStorage.TableUtilities.entityGenerator;

// storing data within the same storage partition
// partition key and row key combo must be unique but also type string
const entityData = {
  PartitionKey: entityGenerator.String("TestPartition"),
  RowKey: entityGenerator.String(uuidv4()),
  firstName: entityGenerator.String(body.firstName),
  lastName: entityGenerator.String(body.lastName),
  age: entityGenerator.Int32(Number(body.age)),
};

try {
  const tableName = "TestTable";

  await createTableIfNotExists(tableName);

  const entity = await insertEntity(tableName, entityData);

  context.res!.status = 200;
  context.res!.body = {
    message: "Data is saved.",
    data: entity,
  };
} catch (error) {
  console.log(error);

  context.res!.status = 400;
  context.res!.body = {
    message: "An error occurred.",
  };
}
Note: Azure Table Storage requires both the partition key and the row key value to be present on storage entities and it also enforces that the type of these columns is a string. The "RowKey" property is utilizing the uuid package that was installed to guarantee that the partition key and row key combination is unique regardless of the other entity data. It's also worth noting that the entity generator isn't required and Azure Table Storage will default to a type of string if the entity row type is not specified.
You will notice that there is no function declared yet with the name "insertEntity". We can add that helper function below the "createTableIfNotExists" function.
const insertEntity = (tableName: string, entity: {}) =>
  new Promise((resolve, reject) => {
    tableService.insertEntity(tableName, entity, (error, result) => {
      if (error) {
        reject(error);
      } else {
        resolve(result);
      }
    });
  });
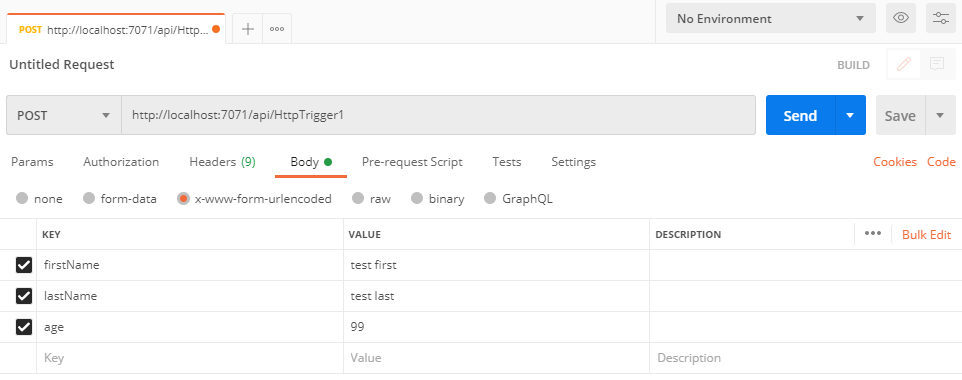
After adding the code to save the table storage entity run the serverless functions again with visual studio code, and submit a post request containing sample data with Postman.
Here is what the request should look like in Postman:
Checking with the Azure Storage Explorer, inside of the "TestTable" there should be one entity, and now we can add code to retrieve this data entity using the partition key and row key values that are saved.
In order to retrieve the Azure Storage entity we will need to add a second helper function to the index.ts file inside the HttpTrigger1 serverless function. This helper function will allow us to retrieve storage entities using the partition key and the row key. Below the "insertEntity" function declaration add the following code:
const retrieveEntity = (
  tableName: string,
  partitionKey: string,
  rowKey: string
) =>
  new Promise((resolve, reject) => {
    tableService.retrieveEntity(
      tableName,
      partitionKey,
      rowKey,
      (error, result) => {
        if (error) {
          reject(error);
        } else {
          resolve(result);
        }
      }
    );
  });
Then the "retrieveEntity" helper function can be called in the conditional branch that will execute on incoming GET requests, however we will need a way to pass the row key value to the function from the incoming request data. To do this we can customize the http endpoint using the functions.json file that is in the HttpTrigger1 function (the same folder as index.ts). In that file add a new key to the first object in the "bindings" array.
The functions.json file should look similar to this :
{
  "bindings": [
    {
      "authLevel": "anonymous",
      "type": "httpTrigger",
      "direction": "in",
      "name": "req",
      "methods": ["get", "post"],
      "route": "HttpTrigger1/{rowKey:guid?}"
    },
    {
      "type": "http",
      "direction": "out",
      "name": "res"
    }
  ],
  "scriptFile": "../dist/HttpTrigger1/index.js"
}
In the route parameter that is being added the pattern to match the row key in the request is specified. The row key will be of type GUID and is optional since post requests will not have a row key to specify. We can now use the retrieve entity function in combination with the request parameter to query Azure Table Storage for the entity data.
Add this code into the GET request method branch to retrieve and return the data:
try {
  const entity = await retrieveEntity(
    "TestTable",
    "TestPartition",
    context.bindingData.rowKey
  );

  context.res!.status = 200;
  context.res!.body = {
    message: "Data retrieved.",
    data: entity,
  };
} catch (error) {
  console.log(error);
  context.res!.status = 400;
  context.res!.body = {
    message: "An error occurred",
  };
}
Then in Postman change the request method to GET and copy the entity row key from table storage so that the url in Postman looks similar to
http://localhost:7071/api/HttpTrigger1/99baf118-fb0b-495e-b839-432264ff6aaa
The row key will be different in your case since it is automatically generated for each entity, so make sure to change that to the entity row key saved to your local table storage. In the response data from postman you should see the following data returned:
{
  "message": "Data retrieved.",
  "data": {
    "PartitionKey": {
      "$": "Edm.String",
      "_": "TestPartition"
    },
    "RowKey": {
      "$": "Edm.String",
      "_": "99baf118-fb0b-495e-b839-432264ff6aaa"
    },
    "Timestamp": {
      "$": "Edm.DateTime",
      "_": "2021-01-30T20:51:49.323Z"
    },
    "firstName": {
      "_": "test first"
    },
    "lastName": {
      "_": "test last"
    },
    "age": {
      "_": 99
    },
    ".metadata": {
      "metadata": "http://127.0.0.1:10002/devstoreaccount1/$metadata#TestTable/@Element",
      "etag": "W/\"datetime'2021-01-30T20%3A51%3A49.323Z'\""
    }
  }
}
In the data property of the response, each of the table storage columns is returned as an object containing two properties, one indicating the table storage data type and the other is the value of the property. There is also an additional metadata field included in the response that provides extra info about the response from Azure Table Storage, or in this case the Azure Storage Emulator.
Azure table storage entities can now be inserted and retrieved, but it is also useful to be able to update an entity that has been previously saved. To do this we can add the PUT request method to the "methods" property of the first object in the "bindings" array located in the functions.json file. Update the "methods" property to look like this:
{
  "methods": ["get", "post", "put", "delete"]
}
The code for the delete method is going to be added later, so that string value has also been added to the array at this time.
After permitting PUT requests in the functions.json add this code to the PUT method conditional branch:
//parses www-form-urlencoded request body
const body = querystring.parse(req.body) as {
  rowKey: string;
  firstName: string;
  lastName: string;
  age: string;
};

// inform table storage of row types
const entityGenerator = azureStorage.TableUtilities.entityGenerator;

// use request body data to maintain row key for entity
const entityData = {
  PartitionKey: entityGenerator.String("TestPartition"),
  RowKey: entityGenerator.String(body.rowKey),
  firstName: entityGenerator.String(body.firstName),
  lastName: entityGenerator.String(body.lastName),
  age: entityGenerator.Int32(Number(body.age)),
};

try {
  const entity = await updateEntity("TestTable", entityData);

  context.res!.status = 200;
  context.res!.body = {
    message: "Data is updated.",
    data: entity,
  };
} catch (error) {
  console.log(error);
  context.res!.status = 400;
  context.res!.body = {
    message: "An error occurred",
  };
}
A third helper function is also needed, shown as "updateEntity" so it can be added below the "retrieveEntity" helper function, above the request method conditional branches:
const updateEntity = (tableName: string, entity: {}) =>
  new Promise((resolve, reject) => {
    tableService.replaceEntity(tableName, entity, (error, result) => {
      if (error) {
        reject(error);
      } else {
        resolve(result);
      }
    });
  });
The "updateEntity" function takes two parameters one being the table name and the other is the updated entity. The partition key and the row key of the entity must match an existing partition/row key combination, or table storage will return an error. If desired there is a function provided by the azure-storage npm package named "insertOrReplaceEntity" which, as the name indicates can either update existing entities or create a new one if one does not exist. In this example the entity already exists so only the "replaceEntity" function is needed.
The PUT request method branch to update an existing entity is almost the same as the POST method branch to insert a new storage entity. The url is the same for both, and the main difference is that the "rowKey" is included in the request body so that the appropriate entity can have it's data updated. You can try it out by changing one of the fields in the request body to a different value and then check in the storage explorer to confirm the entity that was previously inserted and retrieved has the matching table column value updated.
Much like the GET request method branch the DELETE request method does not contain a request body, instead the row key will be passed in the request as a parameter, and like the examples above we can add a fourth helper function to carry out the deletion.
const deleteEntity = (tableName: string, entity: {}) =>
  new Promise((resolve, reject) => {
    tableService.deleteEntity(tableName, entity, (error, result) => {
      if (error) {
        reject(error);
      } else {
        resolve(result);
      }
    });
  });
Then use the "deleteEntity" function in the DELETE request method branch by adding this code:
try {
  // inform table storage of row types
  const entityGenerator = azureStorage.TableUtilities.entityGenerator;

  // use request body data to maintain row key for entity
  const entityData = {
    PartitionKey: entityGenerator.String("TestPartition"),
    RowKey: entityGenerator.String(context.bindingData.rowKey),
  };

  const statusMessage = await deleteEntity("TestTable", entityData);

  context.res!.status = 200;
  context.res!.body = {
    message: "Data deleted.",
    data: statusMessage,
  };
} catch (error) {
  console.log(error);
  context.res!.status = 400;
  context.res!.body = {
    message: "An error occurred",
  };
}
To test this copy the row key value from the storage explorer for the entity previously saved and use the same url from the GET request method example in Postman, but change the request method to DELETE. Then execute the delete request with Postman and in the response section a success message will be displayed:
{
  "message": "Data deleted.",
  "data": {
    "isSuccessful": true,
    "statusCode": 204,
    "body": "",
    "headers": {
      "cache-control": "no-cache",
      "content-length": "0",
      "server": "Windows-Azure-Table/1.0 Microsoft-HTTPAPI/2.0",
      "x-ms-request-id": "3c378130-7a6d-4652-9022-d02320d29c05",
      "x-ms-version": "2018-03-28",
      "x-content-type-options": "nosniff",
      "date": "Sun, 31 Jan 2021 21:23:06 GMT"
    }
  }
}
The response status from Azure Table Storage is 204 No Content, since there is no longer an entity saved in the table. We can verify the entity was deleted by refreshing the table in the storage explorer. The response items shown in the "statusMessage" variable, is the response from Azure Table Storage, and it is being included in the response back from the serverless function to show the consumer of the serverless function API that the delete request to Azure Storage was successful. If the delete request failed the status message would indicate that by setting the "isSuccessful" property value to false.
Here is the complete function file with all code include:
import { AzureFunction, Context, HttpRequest } from "@azure/functions";
import * as azureStorage from "azure-storage";
import * as querystring from "querystring";
import { v4 as uuidv4 } from "uuid";

const httpTrigger: AzureFunction = async function (
  context: Context,
  req: HttpRequest
): Promise<void> {
  context.log("HTTP trigger function processed a request.");

  const tableService = azureStorage.createTableService(
    process.env["TableStorageConnection"]
  );

  const createTableIfNotExists = (tableName: string) =>
    new Promise((resolve, reject) => {
      tableService.createTableIfNotExists(tableName, (error, result) => {
        if (error) {
          reject(error);
        } else {
          resolve(result);
        }
      });
    });

  const insertEntity = (tableName: string, entity: {}) =>
    new Promise((resolve, reject) => {
      tableService.insertEntity(tableName, entity, (error, result) => {
        if (error) {
          reject(error);
        } else {
          resolve(result);
        }
      });
    });

  const retrieveEntity = (
    tableName: string,
    partitionKey: string,
    rowKey: string
  ) =>
    new Promise((resolve, reject) => {
      tableService.retrieveEntity(
        tableName,
        partitionKey,
        rowKey,
        (error, result) => {
          if (error) {
            reject(error);
          } else {
            resolve(result);
          }
        }
      );
    });

  const updateEntity = (tableName: string, entity: {}) =>
    new Promise((resolve, reject) => {
      tableService.replaceEntity(tableName, entity, (error, result) => {
        if (error) {
          reject(error);
        } else {
          resolve(result);
        }
      });
    });

  const deleteEntity = (tableName: string, entity: {}) =>
    new Promise((resolve, reject) => {
      tableService.deleteEntity(tableName, entity, (error, result) => {
        if (error) {
          reject(error);
        } else {
          resolve(result);
        }
      });
    });

  // set content type for all responses
  context.res!.headers["Content-Type"] = "application/json";

  if (req.method == "POST") {
    //parses www-form-urlencoded request body
    const body = querystring.parse(req.body) as {
      firstName: string;
      lastName: string;
      age: string;
    };

    if (
      !(body && body.firstName && body.lastName && !isNaN(Number(body.age)))
    ) {
      context.res!.status = 400;
      context.res!.body = {
        message: "The data is invalid.",
      };
      return;
    }

    // inform table storage of row types
    const entityGenerator = azureStorage.TableUtilities.entityGenerator;

    // storing data within the same storage partition
    // partition key and row key combo must be unique but also type string
    const entityData = {
      PartitionKey: entityGenerator.String("TestPartition"),
      RowKey: entityGenerator.String(uuidv4()),
      firstName: entityGenerator.String(body.firstName),
      lastName: entityGenerator.String(body.lastName),
      age: entityGenerator.Int32(Number(body.age)),
    };

    try {
      const tableName = "TestTable";

      await createTableIfNotExists(tableName);

      await insertEntity(tableName, entityData);

      context.res!.status = 200;
      context.res!.body = {
        message: "Data is saved.",
        data: entityData,
      };
    } catch (error) {
      console.log(error);
      context.res!.status = 400;
      context.res!.body = {
        message: "An error occurred.",
      };
    }
  } else if (req.method == "GET") {
    try {
      const entity = await retrieveEntity(
        "TestTable",
        "TestPartition",
        context.bindingData.rowKey
      );
      context.res!.status = 200;
      context.res!.body = {
        message: "Data retrieved.",
        data: entity,
      };
    } catch (error) {
      console.log(error);
      context.res!.status = 400;
      context.res!.body = {
        message: "An error occurred",
      };
    }
  } else if (req.method == "PUT") {
    //parses www-form-urlencoded request body
    const body = querystring.parse(req.body) as {
      rowKey: string;
      firstName: string;
      lastName: string;
      age: string;
    };

    // inform table storage of row types
    const entityGenerator = azureStorage.TableUtilities.entityGenerator;

    // use request body data to maintain row key for entity
    const entityData = {
      PartitionKey: entityGenerator.String("TestPartition"),
      RowKey: entityGenerator.String(body.rowKey),
      firstName: entityGenerator.String(body.firstName),
      lastName: entityGenerator.String(body.lastName),
      age: entityGenerator.Int32(Number(body.age)),
    };

    try {
      const entity = await updateEntity("TestTable", entityData);
      context.res!.status = 200;
      context.res!.body = {
        message: "Data is updated.",
        data: entity,
      };
    } catch (error) {
      console.log(error);
      context.res!.status = 400;
      context.res!.body = {
        message: "An error occurred",
      };
    }
  } else if (req.method == "DELETE") {
    try {
      // inform table storage of row types
      const entityGenerator = azureStorage.TableUtilities.entityGenerator;

      // use request body data to maintain row key for entity
      const entityData = {
        PartitionKey: entityGenerator.String("TestPartition"),
        RowKey: entityGenerator.String(context.bindingData.rowKey),
      };

      const statusMessage = await deleteEntity("TestTable", entityData);

      context.res!.status = 200;
      context.res!.body = {
        message: "Data deleted.",
        data: statusMessage,
      };
    } catch (error) {
      console.log(error);
      context.res!.status = 400;
      context.res!.body = {
        message: "An error occurred",
      };
    }
  } else {
    // method does not match any
    context.res!.status = 500;
  }
};

export default httpTrigger;
Azure serverless functions are a scalable and cost efficient method to create a RESTful API interface to interact with Azure Table Storage. The code above covers the actions needed to insert, retrieve, update and delete Azure Storage entities, while using TypeScript and the azure-storage and uuid npm packages to execute the methods that correspond to the Azure Table Storage API. Azure Storage entities can be accessed from a consumer of the serverless functions REST API, like a web application, and the Azure Storage credentials and connection string remain secure.